


What we think a yoga pose is “supposed” to look like can often cause discomfort, frustration, and injury because it’s not what our body needs to reach the intention of the pose in question.
Half Moon or Ardha Chandrasana may be one of my favorites, but it can also be a very frustrating pose. Do you feel wobbly or crunched when you perform this pose? Do you think freedom and expansion when you do this pose?
This pose is a great way to find release in a supercharged activity. This pose has a trick: the more muscles that you engage, the easier it is to balance. We tend to jump into the carriage before we know which muscles are needed.
Half Moon is a pose where you want to open up your hips and shoulders and have your spine and hamstrings fully extended. Your balancing leg should be pointing to the top edge of the mat and the rest of the body facing the other side. The anatomy of this pose is not to have one hand on the ground.
It can cause us to get into trouble when we try and force our hand to touch the floor because it’s “what it should” look like. Your hamstring will tremble as you try to stretch it, and your shoulders and chest will collapse on the floor. You may also feel an uncomfortable sensation in your lower back from your leg flailing behind you.
You can be more free when you release the “should” response in this pose. You can customize this pose to suit your needs. Here are four different ways to do Half Moon Pose.
Free Standing
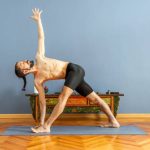
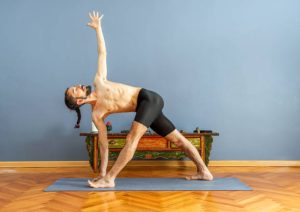
This variation will test your balance. Freestanding Half Moon with Extended Side Angle:
Look at the top edge of your mat, and then shift your weight to your front foot. Plant your bottom palm about 18 inches from your pinkie toe on the front. This will give your torso room to extend fully.
You can also flex your toes and kneecap by lifting your back leg to the sky.
Raise your back arm towards the sky.
For balance, straighten your front leg and push through the big toe mound.
Start by lifting your hand from the floor. Start with your fingers.
To improve your balance, fix your gaze on a single point.
Check that your bottom leg is pointing straight up to the top edge of your mat and not inward. Note: This is a common mistake that can cause your knee to swell and your joints to misalign over time. As you progress, lift your hand off the ground to allow both sides of your chest to be fully extended. You will be able to avoid slumping your lower back and stretching out your lumbar spinal column, which is not good.
Draw your floated heel back an inch or two if you fall forward. If you feel like you’re falling backward, move your floated foot forward an inch or two.
Grab some Blocks
This variation will help you to achieve more side and hamstring extension and add some balance to your pose.
Take one or two blocks. Set the blocks 18in from your pinkie. As in the “Free Standing Variation,” place your bottom hand at the height of the blocks that allows you to have the most extension and opening for your side body AND front hamstring.
Continue with the Free Standing Variation.
Lean against a wall.
This variation will give you more stability, particularly if your pose is a bit shaky.
Place your blocks next to the wall.
The same steps are followed as in the “Grab blocks,” except that your is now up against the wall. This will prevent you from falling over, and you can adjust where you engage, flex, and extend.
Kick Against a Wall
This variation will help you to improve your balance and extend your back leg. Try this variation if your back leg tends to droop.
Place your blocks AND body NEAR to a wall.
Place your legs in a Warrior 2 position, with your knife-edged back foot pointing to the wall and floor.
Place your block(s) 18 inches from your pinkie toe edge in front of you.
Place your back foot on the wall. Your back foot should be positioned at hip height.
Push your back foot into a wall. You will be able to maintain your balance and engage your back leg for stability. You can then fine-tune your ability to engage, flex, and extend or practice lifting your hand off the ground into the “Free Standing Shape” with added stability.
What is your favorite way to get into the Half Moon position that gives you stability? Comment below to share!


+ There are no comments
Add yours