


Tiger Pose simulates the stretch a tiger makes when it wakes up. It is a super delicious spinal lengthener and backbend. Use this posture to stretch out your entire front body, from your ankles all the way through your thighs, abdomen, chest, and up to your throat.
Here’s why it’s important to do this pose!
Tiger Pose: Benefits
Tiger Pose’s back bend helps stimulate adrenal glands and nourish kidneys in those who lead stressful lives.
When using the bound variations, this stretch can be transformed into a great chest opener. Asthmatics and allergy sufferers will benefit from opening their chests. It is also used in Chinese medicine to treat anxiety, depression, and grief.
If you suffer from chronic back pain, Tiger Pose is not for you. However, it can strengthen healthy lumbar muscles and prevent injuries to the back when done slowly.
How to Do Pose
Tiger Pose has several variations, each starting from the Table Top position. The variations range from the most basic to the most complex.
Song Bird
The first option is often called “Song Bird” in stand-up Paddleboard yoga. These are mainly core work and balance exercises.
Stretch one leg parallel to the floor with your foot flexed. You want to keep your hips in line. Lift the opposite arm in front, and stay balanced. As much as you can, maintain a straight line between your fingertips and your heels.
Donkey Kick
The Tiger Option is also known as a Donkey Kick. It is hip strengthening and encourages a small backbend.
Bend the leg you lifted so that your heel is “donkey-kicking” upwards.
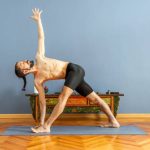
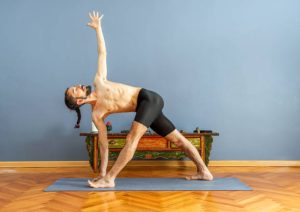
Bound Tiger
Bound Tiger is the classic version. This stretches out your quadriceps and ankle. This variation is very similar to Dancer Pose but done on your knees.
Grab your foot or ankle and kick upwards. In the same way, as in Dancer Pose, make sure that your hips are level to avoid over-extending these ligaments. Use a strap to grab your foot. It will also give your spine more length and prevent that crunching feeling.
As you continue to deepen the backbend, keep your knee pressed into your midline. Pull your stomach in, and your spine will be supported. You may start to test your balance after a few minutes by looking up.
King Tiger
King Tiger is the most challenging variation. It has an overhead to grasp. This variation rotates the shoulder to create a deeper backbend and chest opener. It’s a very difficult pose, so don’t get frustrated if you aren’t there yet.
You can use the wall to assist in the toe grab, or you can twist your elbow and wrist to make it happen. All of these require a warm, supple back, as well as open shoulders and chest. Work on those areas first. The journey is more important than the destination.
Over-extending your back can cause serious injury. If you are hypertensive, overhead toe-grabbing can also be degenerative unless you have strong hip and back muscles to hold you up.
For your entire practice, think about strength and flexibility equally. Strengthen your practice if you are flexible.
Modifications
You may want to place a blanket beneath your knees as padding.
You can use your fists if your wrists hurt for some reason. It is more difficult to balance when you use your fists, which means that your core will need more work. This is a great exercise to strengthen wrists and relieve tenderness.
You could also do all these exercises on your forearms. Some exercises will be harder to do on the lower body, while others are easier.
Remember that the “level” of your practice has nothing whatsoever to do with the depth you go into a certain posture. Your progress in yoga depends on your dedication and mindfulness.
Maybe one day, your toes will touch your back or the top of your head in Tiger Pose. Take it slowly and enjoy the many options you have as you develop your Tiger Pose practice.


+ There are no comments
Add yours